Understanding Your Skin Type and Undertones
Understanding your skin type and undertones is essential for achieving a flawless makeup look. Your skin type refers to the natural characteristics of your skin, such as whether it is oily, dry, or combination. Knowing your skin type will help you choose the right products and techniques to enhance your complexion. Oily skin tends to produce excess sebum, leading to a shiny appearance and potential breakouts. Dry skin, on the other hand, often feels tight and may appear flaky or dull. Combination skin is a combination of both oily and dry areas on different parts of the face.
In addition to understanding your skin type, recognizing your undertones is crucial for selecting the most flattering colors for your complexion. Undertones are the subtle hues that lie beneath the surface of your skin. They can be categorized as warm, cool, or neutral. Warm undertones have a yellow or golden hue, while cool undertones have a blue or pinkish undertone. Neutral undertones have a balance of both warm and cool tones. Identifying your undertones will help you choose foundations, concealers, and other makeup products that harmonize with your natural coloring, giving you a more seamless and natural-looking finish.
• Understanding your skin type is important for choosing the right products and techniques
• Oily skin produces excess sebum, leading to shine and potential breakouts
• Dry skin feels tight and may appear flaky or dull
• Combination skin has both oily and dry areas on different parts of the face
• Recognizing your undertones helps in selecting flattering colors for your complexion
• Warm undertones have a yellow or golden hue
• Cool undertones have a blue or pinkish undertone
• Neutral undertones have a balance of warm and cool tones
• Identifying your undertones helps in choosing foundations, concealers, and other makeup products
that match your natural coloring
• Gives you a more seamless and natural-looking finish.
Prepping Your Canvas: Skincare and Priming Tips
Before applying any makeup, it is essential to properly prepare your skin to ensure a flawless and long-lasting finish. A good skincare routine is the foundation for perfect makeup application. Start by cleansing your face with a gentle cleanser suited to your skin type. This will remove any dirt, oil, or impurities that can clog your pores and affect the way your makeup sits on your skin.
After cleansing, it’s important to moisturize your skin to keep it hydrated and smooth. Choose a moisturizer that is suitable for your skin type – whether it’s oily, dry, or combination. Applying a moisturizer helps create a smooth canvas for your makeup and can prevent it from looking cakey or flaky. Additionally, don’t forget to apply a sunscreen with a good SPF to protect your skin from harmful UV rays. Skin that is well-hydrated and protected will provide the perfect base for your makeup, ensuring it lasts longer and looks more radiant.
• Start by cleansing your face with a gentle cleanser suited to your skin type.
• Choose a moisturizer that is suitable for your skin type – whether it’s oily, dry, or combination.
• Apply a sunscreen with a good SPF to protect your skin from harmful UV rays.
Choosing the Right Foundation and Concealer for Flawless Coverage
Choosing the right foundation and concealer is essential for achieving a flawless and perfect complexion. When it comes to foundation, it’s important to find a shade that matches your skin tone. This can be done by swatching the foundation on your jawline or wrist and checking if it blends seamlessly with your natural skin color. Additionally, consider the coverage level of the foundation. If you have blemishes or uneven skin tone, a medium to full coverage foundation might be more suitable. However, if you have relatively clear skin, you can opt for a light or sheer coverage foundation for a more natural look.
In addition to foundation, selecting the right concealer is equally important for flawless coverage. Concealers are designed to cover up imperfections such as dark circles, blemishes, and redness. When choosing a concealer, consider the shade that matches your foundation to ensure a seamless blend. It’s also vital to choose a formula that suits your specific needs. For example, if you have dry skin, opt for a hydrating concealer to prevent it from settling into fine lines. On the other hand, if you have oily skin, a matte or long-wearing concealer may be more suitable to combat shine throughout the day. By selecting the right foundation and concealer, you can achieve a flawless complexion that enhances your natural beauty.
• Swatch the foundation on your jawline or wrist to find a shade that matches your skin tone
• Check if the foundation blends seamlessly with your natural skin color
• Consider the coverage level of the foundation based on your blemishes or uneven skin tone
• Medium to full coverage is suitable for blemishes, while light or sheer coverage is ideal for clear skin
• Choose a concealer shade that matches your foundation for seamless blending
• Select a formula that suits your specific needs (e.g., hydrating concealer for dry skin)
• Prevent settling into fine lines by opting for a hydrating concealer if you have dry skin
• Combat shine throughout the day with a matte or long-wearing concealer if you have oily skin
By selecting the right foundation and concealer, you can achieve flawless coverage and enhance your natural beauty.
Mastering the Art of Contouring and Highlighting
Contouring and highlighting have become must-have techniques in the world of makeup, adding dimension and definition to the face. The art of contouring involves using a darker shade to create shadows, while highlighting aims to bring light to certain areas, emphasizing features and creating a youthful glow. Understanding your face shape is crucial when it comes to contouring. Different face shapes require various techniques to achieve the desired effect. Oval faces may need minimal contouring, whereas round faces can benefit from sculpting the cheeks and jawline. By studying your unique facial structure, you can enhance your natural beauty through strategic shading and highlighting.
To begin the contouring process, choose a matte bronzer or powder that is a few shades darker than your skin tone. Focus on the areas where shadows naturally fall, such as the hollows of your cheeks, the temples, and the sides of the nose. Use a fluffy angled brush to apply the product with light strokes, blending it well for a seamless effect. Remember, less is more – build up the color gradually to achieve a natural-looking contour. On the other hand, highlighting involves using a lighter shade on the high points of your face, such as the tops of your cheekbones, the brow bone, and the bridge of your nose. Choose a luminous or pearlescent powder or liquid highlighter, and apply it with a small brush or your fingertips for a soft, ethereal glow. The technique varies depending on personal preference and the level of intensity you desire, so experiment with different products and application techniques to find what works best for you. The key is to seamlessly blend both the contour and highlight, ensuring a perfectly balanced and sculpted appearance.
• Contouring involves using a darker shade to create shadows
• Highlighting aims to bring light to certain areas of the face
• Understanding your face shape is crucial for effective contouring and highlighting
• Oval faces may require minimal contouring, while round faces can benefit from sculpting the cheeks and jawline
• Choose a matte bronzer or powder that is a few shades darker than your skin tone for contouring
• Focus on areas where shadows naturally fall, such as the hollows of your cheeks, temples, and sides of the nose
• Use a fluffy angled brush to apply the product with light strokes and blend well for a seamless effect
• Less is more – build up color gradually for a natural-looking contour
• Highlight high points of the face with a lighter shade, such as cheekbones, brow bone, and bridge of nose
• Choose luminous or pearlescent powder or liquid highlighter
• Apply highlighter with small brush or fingertips for soft glow
• Experiment with different products and techniques to find what works best for you
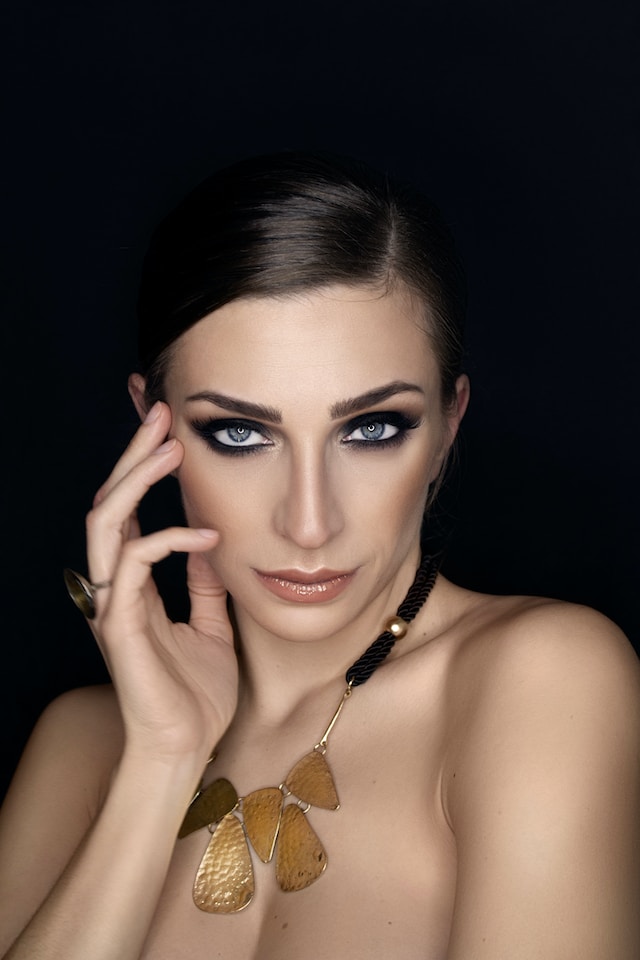
Accentuating Your Eyes: Eyeshadow Techniques and Tips
When it comes to accentuating your eyes, choosing the right eyeshadow colors can make all the difference. Understanding your eye color and skin tone can help you determine the most flattering shades to enhance your natural beauty. For example, individuals with blue eyes may find that copper, gold, or peachy tones make their eyes pop, while those with brown eyes may opt for deep purples or earthy browns to create a striking contrast. Experimenting with different colors and textures can help you discover the perfect combination that complements your unique features.
In addition to color selection, the technique of applying eyeshadow can also greatly impact the way your eyes appear. One popular technique is known as the “crease and blend” method, which involves using a matte shade in the crease of the eye to create depth and dimension. This is then blended out with a neutral shade to soften any harsh lines. Another technique is the “halo eye,” where a lighter shade is applied to the center of the lid, surrounded by a darker shade on the inner and outer corners. This creates a halo effect that draws attention to the center of the eye. Experimenting with different application techniques can help you achieve various looks, from subtle and natural to bold and dramatic.
• Choosing the right eyeshadow colors can enhance your natural beauty
• Understanding your eye color and skin tone is key in selecting flattering shades
• Blue eyes may pop with copper, gold, or peachy tones
• Brown eyes can create a striking contrast with deep purples or earthy browns
• Experimenting with different colors and textures helps find the perfect combination
– Applying eyeshadow technique greatly impacts how your eyes appear
– The “crease and blend” method creates depth using matte shade in crease, blended out with neutral shade to soften lines
– The “halo eye” technique uses lighter shade on center of lid surrounded by darker shade on inner and outer corners for a halo effect
– Different application techniques allow for subtle to bold looks
Achieving Perfectly Defined Brows
Creating perfectly defined brows is an essential step in achieving a polished and put-together look. Well-groomed brows can instantly frame your face and enhance your natural features. To achieve this, start by determining the shape that suits your face best. Consider the natural shape of your brows and work with it, rather than trying to force a different shape. If you’re unsure, consult with a professional brow stylist who can guide you in finding the perfect shape that flatters your unique facial structure.
Once you have determined the shape, it’s time to groom and fill in your brows. Start by using a spoolie brush to comb your brows upward, as this helps reveal any sparse areas that need filling. Next, choose a brow product that matches the color of your natural brows or is one shade lighter for a softer look. Whether you prefer a brow pencil, powder, or gel, it is crucial to use light, feathery strokes to mimic the appearance of real brow hairs. Take your time, step back occasionally, and assess your work to ensure a natural and seamless result. Remember, less is often more when it comes to filling in brows – aim for a subtle enhancement rather than bold, exaggerated brows.
• Determine the shape of your brows that suits your face best
• Consider consulting with a professional brow stylist for guidance
• Use a spoolie brush to comb your brows upward and reveal sparse areas
• Choose a brow product that matches the color of your natural brows or is one shade lighter
• Use light, feathery strokes to mimic real brow hairs when filling in
• Take breaks and step back occasionally to assess your work for a natural result
• Aim for subtle enhancement rather than bold, exaggerated brows.
Adding Drama with Eyeliner and Mascara
Eyeliner and mascara are essential tools for adding drama to your eye makeup look. By carefully applying these products, you can make your eyes appear bigger, bolder, and more captivating.
When it comes to eyeliner, there are several options to choose from—liquid, gel, pencil, or even eyeshadow. Each type offers different benefits and effects, so it’s important to consider your personal preference and desired look. To create a bold and defined line, opt for a liquid or gel formula with a fine brush tip. For a softer, smoky effect, use a pencil or eyeshadow and smudge it gently along the lash line. Remember to start thin and gradually build the intensity for a more precise application.
Now, let’s talk about mascara—the holy grail of voluminous lashes. Mascara can instantly transform your eyes by providing length, curl, and thickness to your lashes. To achieve a dramatic look, choose a mascara formula that offers volume and curl. Start by curling your lashes with an eyelash curler, then carefully apply the mascara from the roots to the tips in a zigzag motion. For extra drama, consider applying multiple coats of mascara, but be sure to let each coat dry before applying the next to prevent clumping. With the right eyeliner and mascara, you can take your eye makeup to a whole new level of allure and intensity.
• Eyeliner and mascara are essential tools for adding drama to your eye makeup look.
• Different types of eyeliner offer different benefits and effects, such as liquid, gel, pencil, or eyeshadow.
• Liquid or gel formulas with fine brush tips create bold and defined lines.
• Pencil or eyeshadow can be smudged gently along the lash line for a softer, smoky effect.
• Start thin and gradually build the intensity for a more precise application.
• Mascara provides length, curl, and thickness to your lashes for a dramatic look.
• Choose a mascara formula that offers volume and curl.
• Curl your lashes with an eyelash curler before applying mascara in a zigzag motion from roots to tips.
• Consider applying multiple coats of mascara for extra drama but let each coat dry before applying the next to prevent clumping.
Creating Luscious Lips: Lipstick and Lip Liner Application
When it comes to creating luscious lips, mastering the art of lipstick and lip liner application is essential. These two products work together to enhance the shape and fullness of your lips, creating a bold and captivating look.
First, start by choosing the right lip liner color that complements your lipstick shade. Opt for a lip liner that is either the same color as your natural lips or matches your lipstick color. This will ensure a seamless application and prevent any noticeable contrast between the liner and lipstick. Use the lip liner to outline your lips, following their natural shape. For added fullness, slightly overline your lips by drawing the liner just outside your natural lip line. Make sure to blend the liner towards the center of your lips to avoid any harsh lines. Once you have outlined your lips, fill them in with the same lip liner to create a base for your lipstick. This will help your lipstick to adhere better and last longer throughout the day. Finally, apply your lipstick with a brush or directly from the tube, starting from the center of your lips and blending outwards. Take your time to ensure an even and precise application, and blot any excess product with a tissue for a long-lasting finish.
• Choose a lip liner color that complements your lipstick shade
• Opt for a lip liner that matches your natural lips or lipstick color
• Outline your lips using the lip liner, following their natural shape
• Overline your lips slightly for added fullness, blending towards the center of your lips
• Fill in your lips with the same lip liner to create a base for your lipstick
• Apply your lipstick starting from the center and blending outwards
• Use a brush or apply directly from the tube
• Take time for an even and precise application
• Blot any excess product with a tissue for a long-lasting finish
Setting and Finishing: Tips for Long-lasting Makeup
A key factor in achieving long-lasting makeup is the application of a setting powder. Setting powders help to lock in your foundation, concealer, and other products, ensuring that they stay in place throughout the day. When selecting a setting powder, opt for a finely milled formula that matches your skin tone. This will provide a seamless finish and prevent any cakiness or flashback in photographs. Use a fluffy brush to lightly dust the powder over your entire face, focusing on areas where makeup tends to crease or fade, such as the T-zone and under the eyes. This simple step will help to extend the wear of your makeup and keep it looking fresh for hours.
Another important tip for long-lasting makeup is the use of a setting spray. Setting sprays work by creating a thin, protective film over your makeup, helping it to withstand heat, humidity, and other external factors. After completing your makeup application, hold the setting spray about an arm’s length away from your face and mist it evenly over your skin. Allow it to air dry for a few seconds before touching or blending your makeup. Not only will a good setting spray help to lock in your makeup, but it will also give your skin a natural, dewy finish. Remember to choose a setting spray that suits your skin type, whether you have oily, dry, or combination skin, to ensure optimal results.
• Use a finely milled setting powder that matches your skin tone
• Apply the powder with a fluffy brush, focusing on areas prone to creasing or fading
• This will help lock in your foundation and concealer for long-lasting wear
• Avoid cakiness or flashback in photographs by choosing the right formula
• Setting powders help extend the wear of your makeup and keep it looking fresh
• Consider using a setting spray to further enhance the longevity of your makeup
• Setting sprays create a protective film over your makeup, making it more resistant to external factors like heat and humidity
• Hold the spray about an arm’s length away from your face and mist it evenly over your skin after completing your makeup application
• Allow it to air dry before touching or blending your makeup for best results
• Choose a setting spray that suits your skin type (oily, dry, combination) for optimal performance
• A good setting spray can also give you a natural, dewy finish
Exploring Advanced Techniques: Color Correcting and Complexion Enhancement
Achieving a flawless complexion requires more than just foundation and concealer. One advanced technique to consider is color correcting, which involves using different shades of concealers or color correctors to neutralize specific skin concerns. For example, if you have dark under-eye circles, using a peach or orange color corrector can help cancel out the blue or purple tones before applying your regular concealer. Likewise, if you have redness or blemishes, a green color corrector can help counteract the red tones. Color correcting is all about understanding the color wheel and choosing the opposite shade to neutralize the problem area. By incorporating this technique into your routine, you can achieve a more even complexion and reduce the need for heavy foundation.
In addition to color correcting, complexion enhancement techniques can also help improve the overall appearance of your skin. One popular method is using illuminating or radiance-boosting products to add a subtle glow to your complexion. These products typically have light-reflecting properties that can give your skin a healthy and luminous effect. Another technique is contouring and highlighting, which involves using darker and lighter shades of makeup to sculpt and define your facial features. By strategically applying these products, you can enhance your cheekbones, slim down your nose, and create the illusion of a more chiseled face shape. Whether you prefer a natural or more dramatic look, exploring advanced techniques like color correcting and complexion enhancement can help you achieve a flawless-looking complexion.
• Color correcting involves using different shades of concealers or color correctors to neutralize specific skin concerns
• Peach or orange color corrector can cancel out dark under-eye circles
• Green color corrector can counteract redness or blemishes
• Understanding the color wheel is important for choosing the opposite shade to neutralize problem areas
• Incorporating color correcting into your routine can result in a more even complexion and reduce the need for heavy foundation
• Complexion enhancement techniques improve overall appearance of skin
• Illuminating or radiance-boosting products add a subtle glow to complexion
• These products have light-reflecting properties that give skin a healthy and luminous effect
• Contouring and highlighting involve using darker and lighter shades of makeup to sculpt and define facial features
• Strategic application of these products enhances cheekbones, slims down nose, and creates illusion of a chiseled face shape
• Exploring advanced techniques like color correcting and complexion enhancement helps achieve flawless-looking complexion